In this article I will introduce and help you to run kubernetes, avoiding any pain and deep concepts. Because If you try to understand you may fall into a deep rabbit-hole. Lets avoid the rabbit-hole for now.
POD is the Basic Building Block in Kubernetes
The followings are the basic commands when you are quickly need to check the status of current status of the kubernetes cluster. Here we are considering the kubectl already installed and configured (if not refer to here)
# show pods with all namespaces
kubectl get pods --all-namespaces

# describe the pod at the given namespace
kubectl describe pod POD_NAME_MUST_BE_HERE --namespace=kube-public

# delete pod with name nginx
kubectl delete deployment nginx

# create a new pod with given yml definition file
kubectl create -f pod-definition.yml
Lets see how the pod-definition.yml looks like
apiVersion: v1
kind: Pod
metadata:
    name: myapp-pod
    labels:
        app: myapp
spec:
    containers:
        - name: nginx-container
          image: nginx
The above description file describes that this pod contains nginx container, in order to activate do the following:
kubectl apply -f pod-definition.yml
Replication Controller and ReplicaSets (Bigger Building Blocks)
- Replication Controller is responsible to create a replica of the pod or node
- It also responsible for load Balancing requests across pods and nodes
There are two similar terms: Replication Controller and Replica Set and both have same purpose
- Replication controller is older technology
- Replica Set is a new recommended way of applying replica
Here is of how replica controller can be created (rc-definition.yml):
apiVersion: v1
kind: ReplicationController
metadata:
    name: myapp-rc
    labels:
        app: myapp
        type: front-end
spec:
    template:
        //
        //
        //   here pod defintion can be used from above
        //
        //
    replicas: 3
Replica-set defition is declared same as replication-controller but with only one difference, where in the spec section the selector is mentioned (replicaset-definition.yml):
apiVersion: apps/v1
kind: ReplicaSet
metadata:
    name: myapp-replicaset
    labels:
        app: myapp
        type: front-end
spec:
    template:
        //
        //
        //   here pod defintion can be used from above
        //
        //
    replicas: 3
    selector:
        matchLabels:
            type: front-end
Selector section searches and applies replica to all pods that are match to type (in this case “fron-end”). It means the pod doesn’t have to be declared under template alone. So we may create pods separately and then bind them through the selector
If by some reason we need to scale-out the number of replicas from 3 to 6, then we just update the yaml configuration file by changing the number from 3 to 6, and run the kubectl replace command:
kubectl replace -f replicaset-definition.yml
Another way is to use kubectl scale command:
kubectl scale --replicas=6 -f replicaset-definition.yml
kubectl scale --replicas=6 replicaset myapp-replicaset
However the usage of kubectl scale command is not that much preferable, because it doesn’t updates the yaml configuration file. The file should be updated manually.
Deployments (Even Bigger Building Block)
A Deployment provides declarative updates for Pods and ReplicaSets that are described above. As all the other building blocks the deployment describe a desired state and deployment controller changes the actual state of the cluster to the desired one (the one described in deployment yaml file)
apiVersion: apps/v1
kind: Deployment
metadata:
    name: myapp-deployment
    labels:
        app: myapp
        type: front-end
spec:
    template:
        //
        //
        //   here pod defintion can be used from above
        //
        //
    replicas: 3
    selector:
        matchLabels:
            type: front-end
Then we can use the deployment related commands to see deployment states
kubectl get deployments
Finally, to see all the objects at once run following command:
kubectl get all --all-namespaces
Deployment Strategies
- Recreate Strategy
- Rolling Update Strategy (default strategy)
Do the necessary changes and do apply:
kubectl apply -f deployment-definition.yml
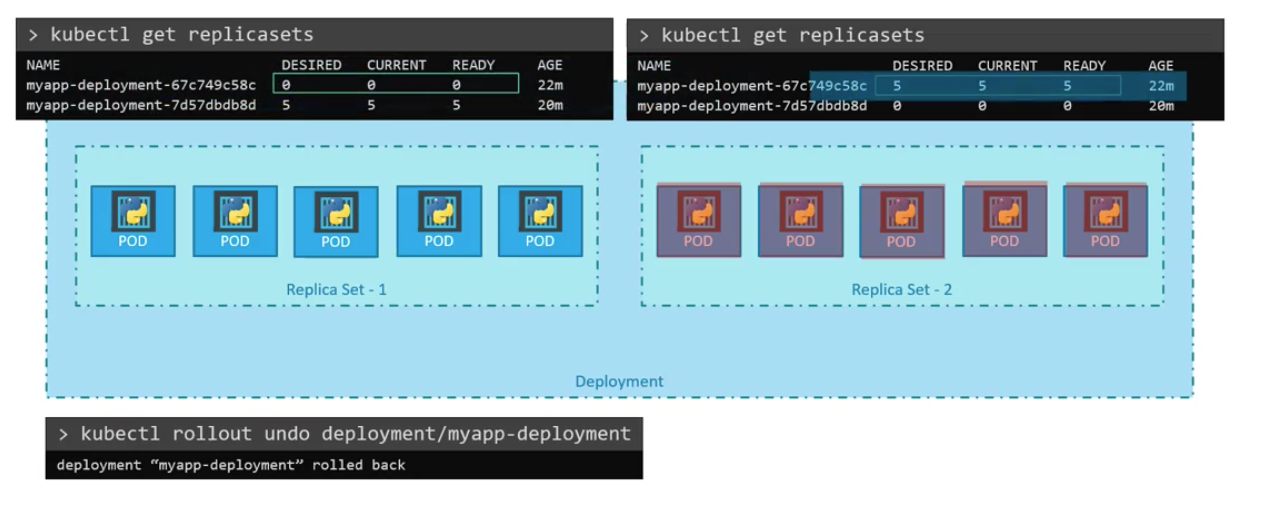
Rollback
Sometimes the circumstances require us to rollback our deployment. There multiple ways of rolling-back the deployment, but the must quickest way is the throw the command for rollback, which goes as follows:
kubectl rollout undo deployment/myapp-deployment
Kubernetes Networking
- IP Address is assigned to a POD (not to a container).
Network is created when the Kubernetes pods are created. That network is used to communicate between pods.
- All containers/PODs can communicate to one another without NAT
- All nodes can communicate with all containers and vice-versa without NAT In case of cluster network we have to figure it out the networking among pods from different nodes
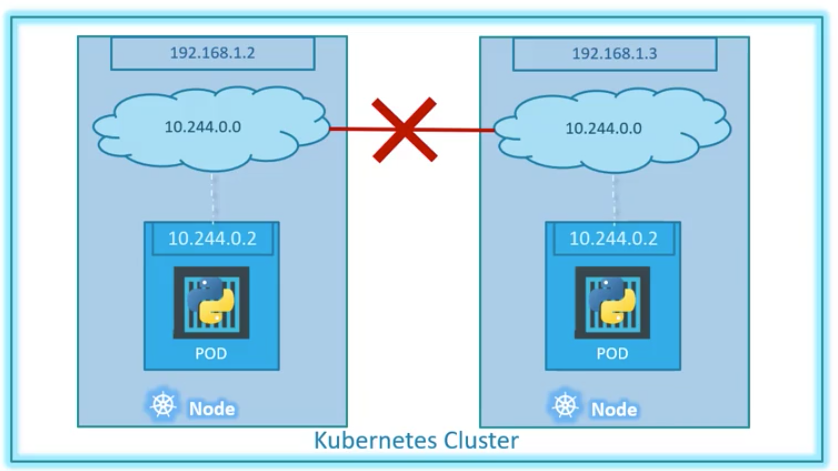
The following network solutions are used for kubernetes:
- cisco
- flannel
- nsx
- cilium
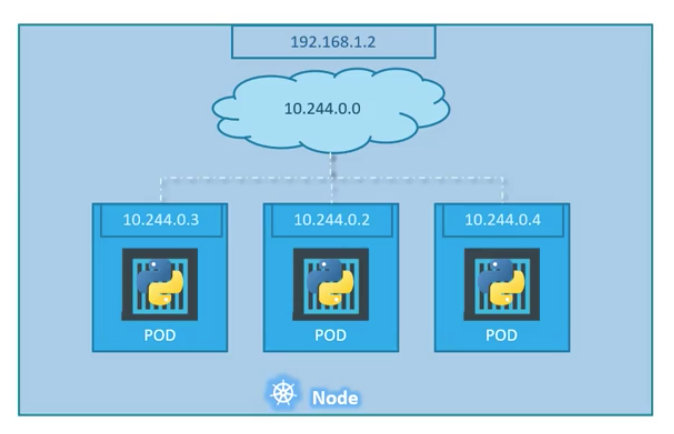
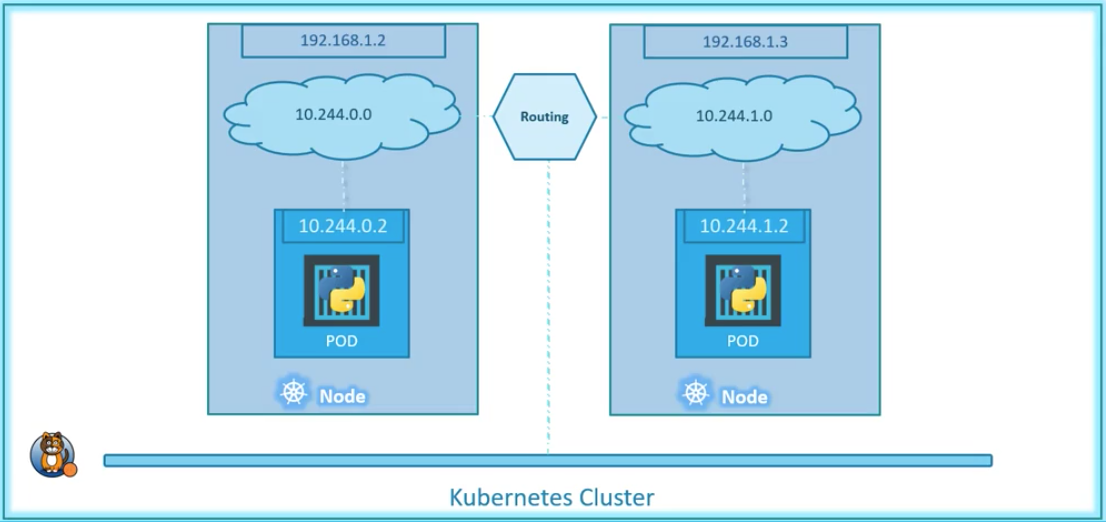
Here is how it will be look like if flannel networking solution is applied
Services
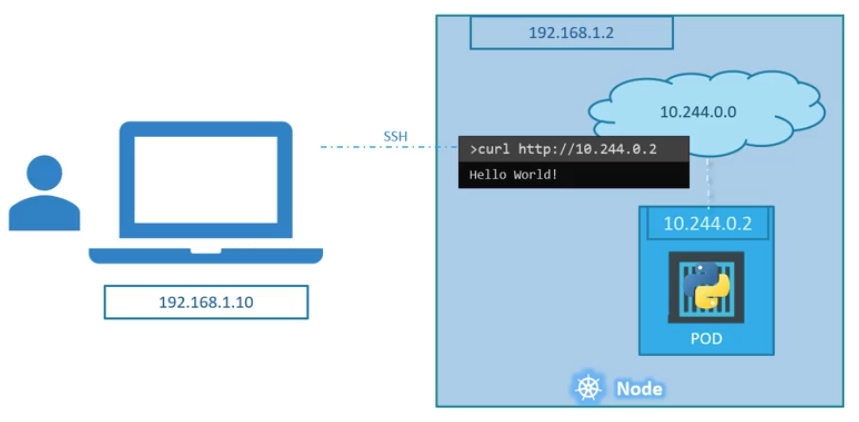
If we want to access the services that runs on our pod inside the node we have to connect to the node first with ssh and then run curl (following figure depicts that)
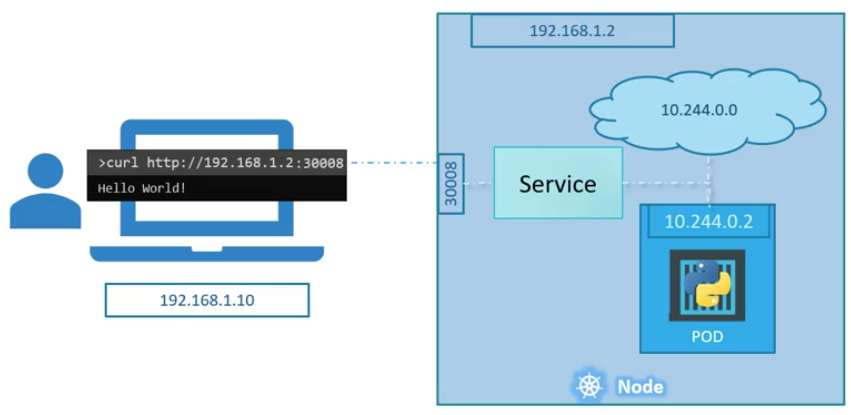
If we want to access to the pod’s service from the outside we need to use Kubernetes Service. Kubernetes Service is an object that listens to the port that comes to the node and connects it with our pods. That kind of service calls “Node Port Service”
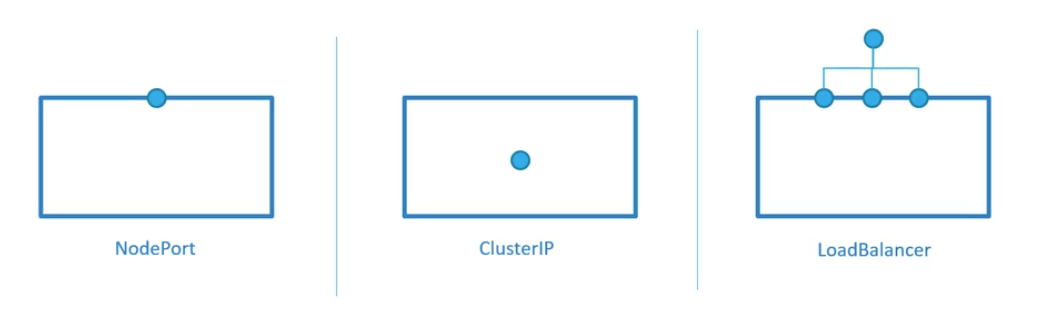
There are other types of services exist:
- NodePort
- ClusterIP - service creates virtual IP
- LoadBalancer
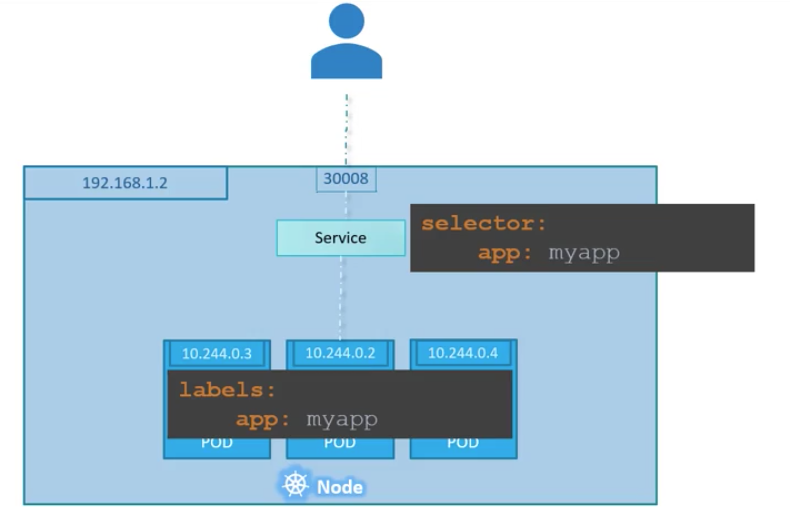
Service - NodePort
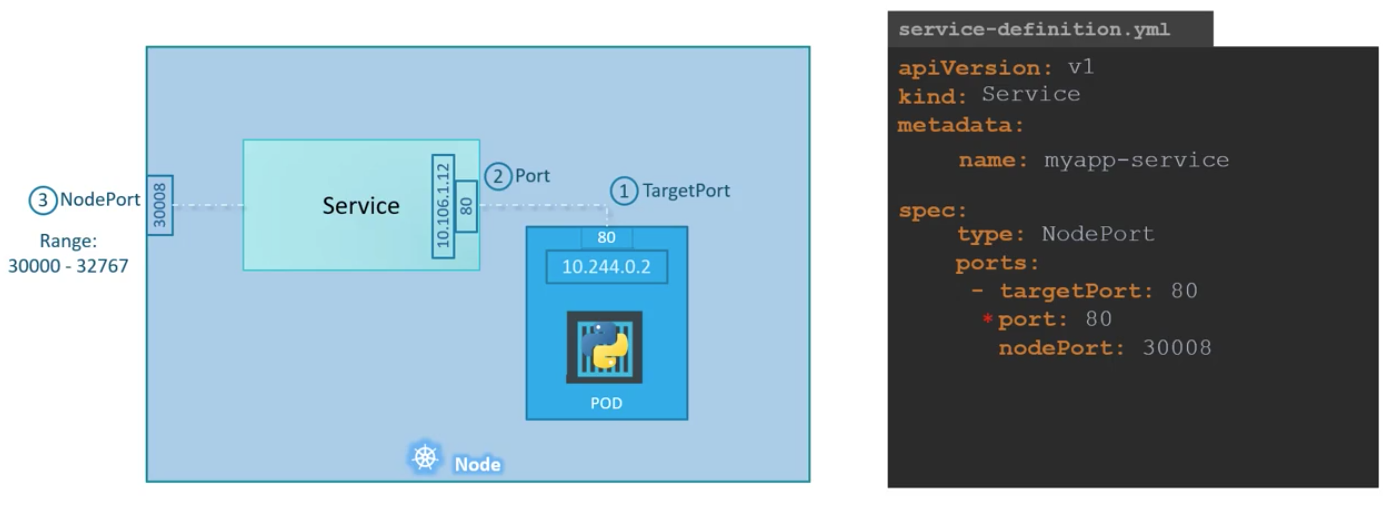
If nodePort is not provided then random port is assigned (starting from 30007)
Service also can be bind using labels throughout the multiple yaml files:
then we can create a service with kubectl create command as we have created other objects:
kubectl create -f service-definition.yml

kubectl get services

curl http://192.168.1.2:30008
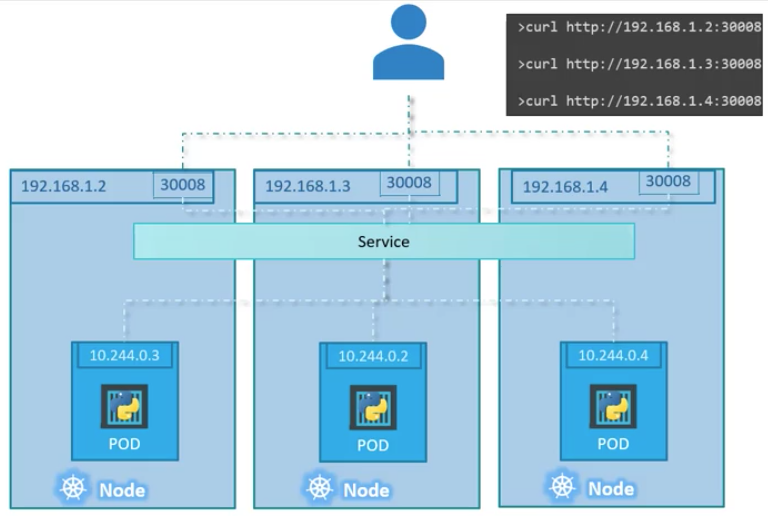
Lets how NodePort Service can be connected with multiple pods, which can be implemented using selector
For Load Balancing random algorithm is used
Multiple pods on multiple nodes are handled by kubernetes as follows:
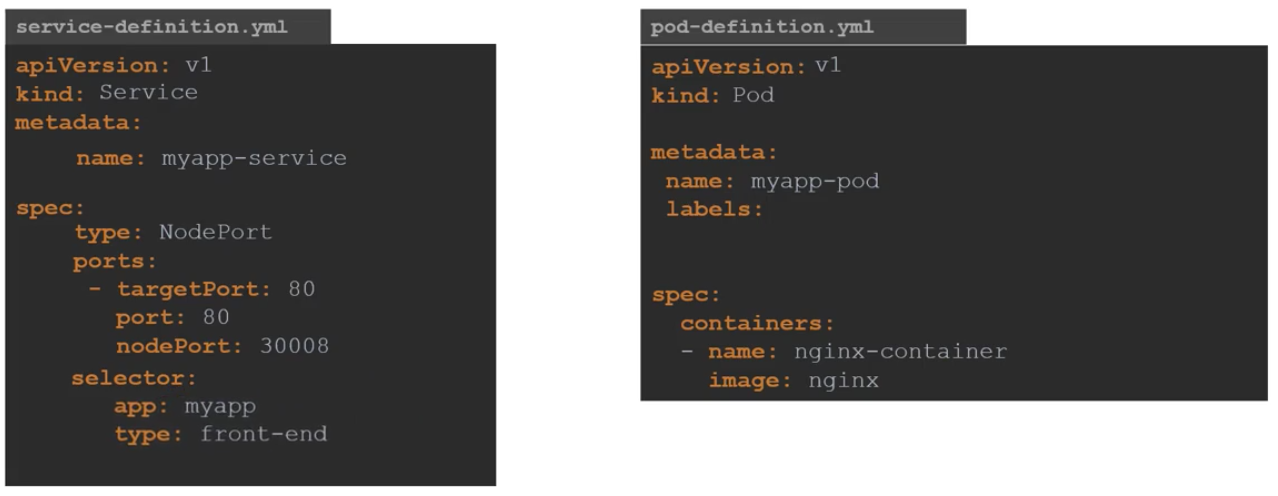
Example: pod-definition.yml
apiVersion: v1
kind: Pod
metadata:
    name: myapp-pod
    labels:
        app: myapp

spec:
    containers:
        - name: nginx-container
          image: nginx
service-defintion.yml
apiVersion: v1
kind: Service
metadata:
    name: myapp-service

spec:
    type: NodePort
    ports:
        - targetPort: 80
          port: 80
          nodePort: 30008
    selector:
        app: myapp
kubectl create -f service-definition.yml
kubectl get services
ClusterIP Service
This is the way we give a name to our services, in order to allow services interact through each other
pod-definition.yml
apiVersion: v1
kind: Pod
metadata:
    name: myapp-pod
    labels:
        app: myapp
spec:
    containers:
    - name: nginx-container
      image: nginx
service-definition.yml
apiVersion: v1
kind: Service
metadata:
    name: back-end
spec:
    type: ClusterIP
    ports:
     - targetPort: 80
       port: 80

    selector:
        app: myapp
        type: back-end
kubectl create -f service-definition.yml
kubectl get services
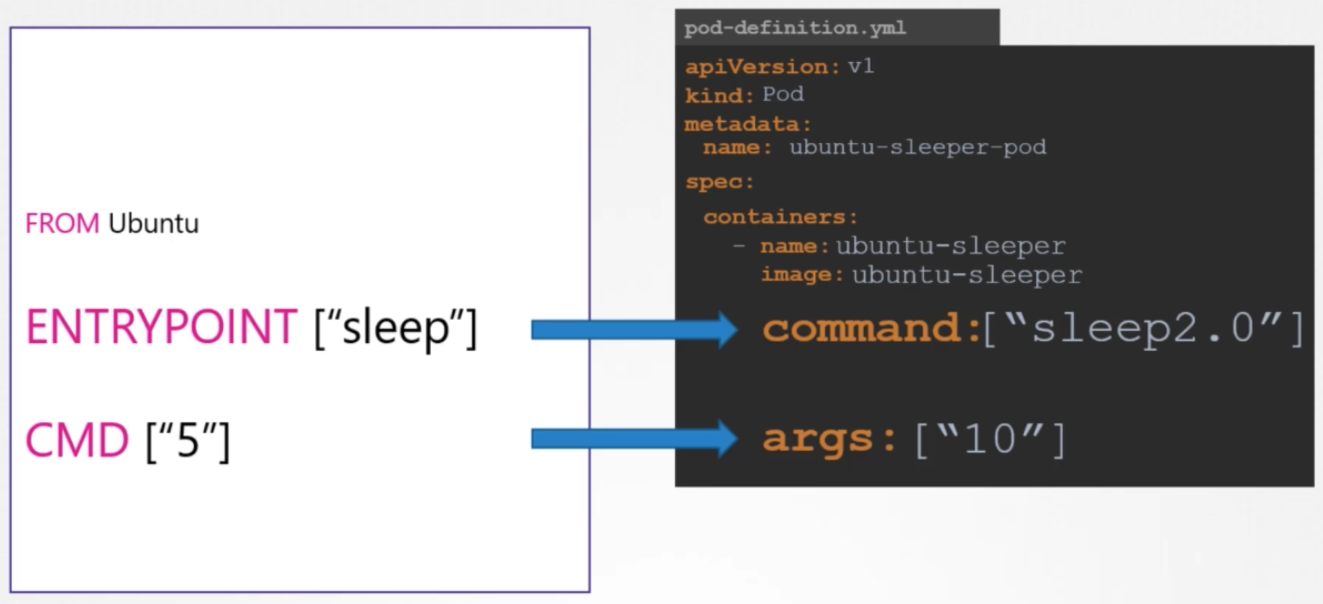
Dockerfile and Kubernetes Arguments Correspondence
Dockerfile commands and entrypoints can be used in Kubernetes yaml files, but its little bit confusing, must be very careful. Dockerfiles ENTRYPOINT is proportional to kubernetes’s command, and dockerfiles CMD corresponds to args in kubernetes yaml file. Look at the following picture for details:
In order to set environment variable in kubernetes the “env” field can be used, under container details, as follows:
apiVersion: v1
kind: Pod
metadata:
    name: simple-webapp-color
    labels:
        app: myapp
spec:
    containers:
    - name: simple-webapp-color
      image: simple-webapp-color
      ports:
        - containerPort: 8080
    env:
        - name: APP_COLOR
          value: pink
Environment field also can be applying by utilizing configMaps and Secrets as follows:
env:
    - name: APP_COLOR
      valueFrom:
        configMapKeyRef:
env:
    - name: APP_COLOR
      valueFrom:
        secretKeyRef:
ConfigMaps
ConfigMap is injected to the pod. ConfigMap can be created imperative (by command-line) and declarative (from configuration file) ways.
Imperative way:
kubectl create configmap app-config --from-literal=APP_COLOR=blue --from-literal=APP_MOD=prod
Declarative config file which is called by “kubectl create -f config-map.yaml”
config-map.yaml
apiVersion: v1
kind: ConfigMap
metadata:
    name: app-config
data:
    APP_COLOR: blue
    APP_MODE: prod
to see information about configmaps following commands can be used:
kubectl get configmaps --all-namespaces
kubectl describe configmaps --all-namespaces
Finally it can be embedded into pod definition file as follows (envFrom.configMapRef.name is the reference to configMap):
apiVersion: v1
kind: Pod
metadata:
    name: simple-webapp-color
    labels:
        name: simple-webapp-color
spec:
    containers:
    - name: simple-webapp-color
      image: simple-webapp-color
      ports:
        - containerPort: 8080
      envFrom:
        - configMapRef:
            name: app-config
Secret
Secret is used same as configMaps except that it hides the value of the keys by applying encryption.
apiVersion: v1
kind: Secret
metadata:
    name: app-secret
data:
    DB_Host: mysql
    DB_User: root
    DB_Password: password
To see created secrets use following commands:
kubectl get secrets
kubectl describe secrets
For encrypting and decrypting following commands can be used (correspondingly):
echo -n 'mysql' | base64
echo -n 'bXlzcWw=' | base64 --decode
Injecting into the Pod can be done as follows:
apiVersion: v1
kind: Pod
metadata:
    name: simple-webapp-color
    labels:
        name: simple-webapp-color
spec:
    containers:
    - name: simple-webapp-color
      image: simple-webapp-color
      ports:
        - containerPort: 8080
      envFrom:
        - secretRef:
            name: app-config