Original idea of Circuit Breaker comes from electronic engineering where it comes in a form of automatic switch that designed to protected electrical circuit from damage by excess of current in the circuit.
In software world Circuit Breaker comes in a form of software code which can be embedded to the system in a various ways (in a form of: source code, library, proxy, remote service etc). In a big picture the software circuit breaker does the same job, by saving the system from fatal crash. Here how the workflow of the circuit breaker looks like:
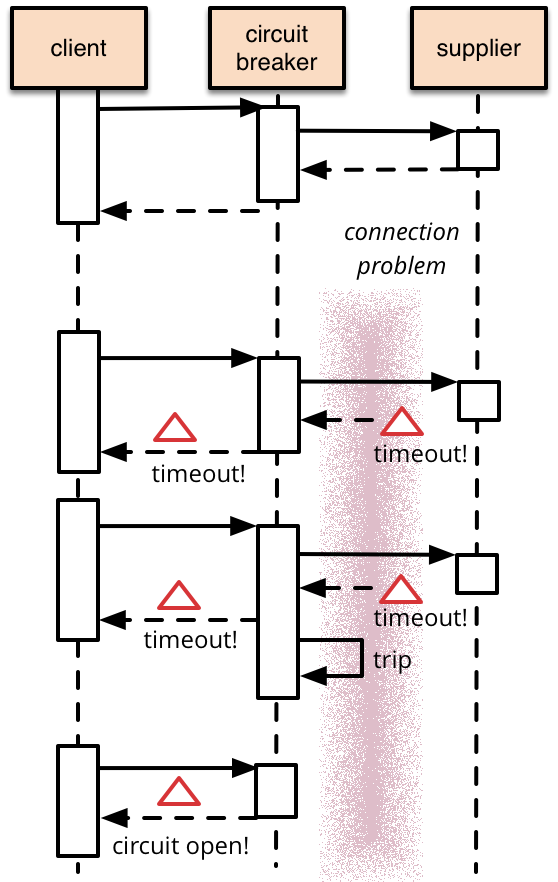
Basically circuit breaker can be in a two states: CLOSED or OPEN.
PAY ATTENTION: CLOSED state means flow goes as expected, OPEN means situation is not good and we are going into fallback mode
Circuit Breaker in Distributed Computing
As we have mentioned circuit breaker can be applied in various ways to our system, and the most reliable way in my opinion usage of existing library solutions. The cost of approaching with a mindset like “Oh, it looks easy, I can do it myself” could be very high in production.
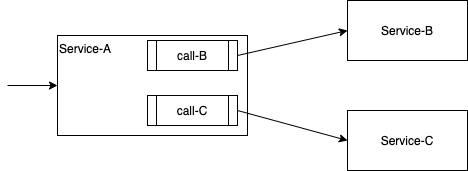
Even though the circuit breaker pattern considers wrapping method, in the concern of distributed systems we can apply the circuit breaker to the service interconnection.
Service-A that depends on Service-B and Service-C
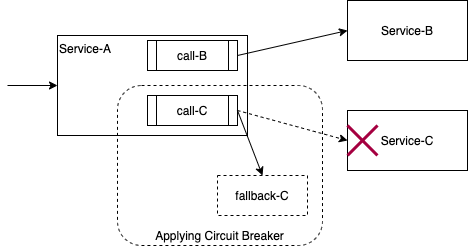
After applying circuit breaker technic:
Few years ago I have found myself reading about Hystrix, the popular circuit breaker solution developed by netflix. Many enterprises were using hystrix in their production (I have found out when I visited conferences). Now If you visit official github page of hystrix, it says “Hystrix is no longer in active development, and is currently in maintenance mode” and advises us to use another solution called resilience4j
Resilience4j
Resilience4j is a lightweight fault tolerance library inspired by Netflix Hystrix, but designed for Java 8 and functional programming. Lightweight, because the library only uses vavr, which does not have any other external library dependencies. Resilience4j provides higher-order functions (decorators) to enhance any functional interface, lambda expression or method reference with a Circuit Breaker, Rate Limiter, Retry, Bulkhead, Time limiter and Cache modues. You can stack more than one decorator on any functional interface, lambda expression or method reference. The advantage is that you have the choice to select the necessary decorators.
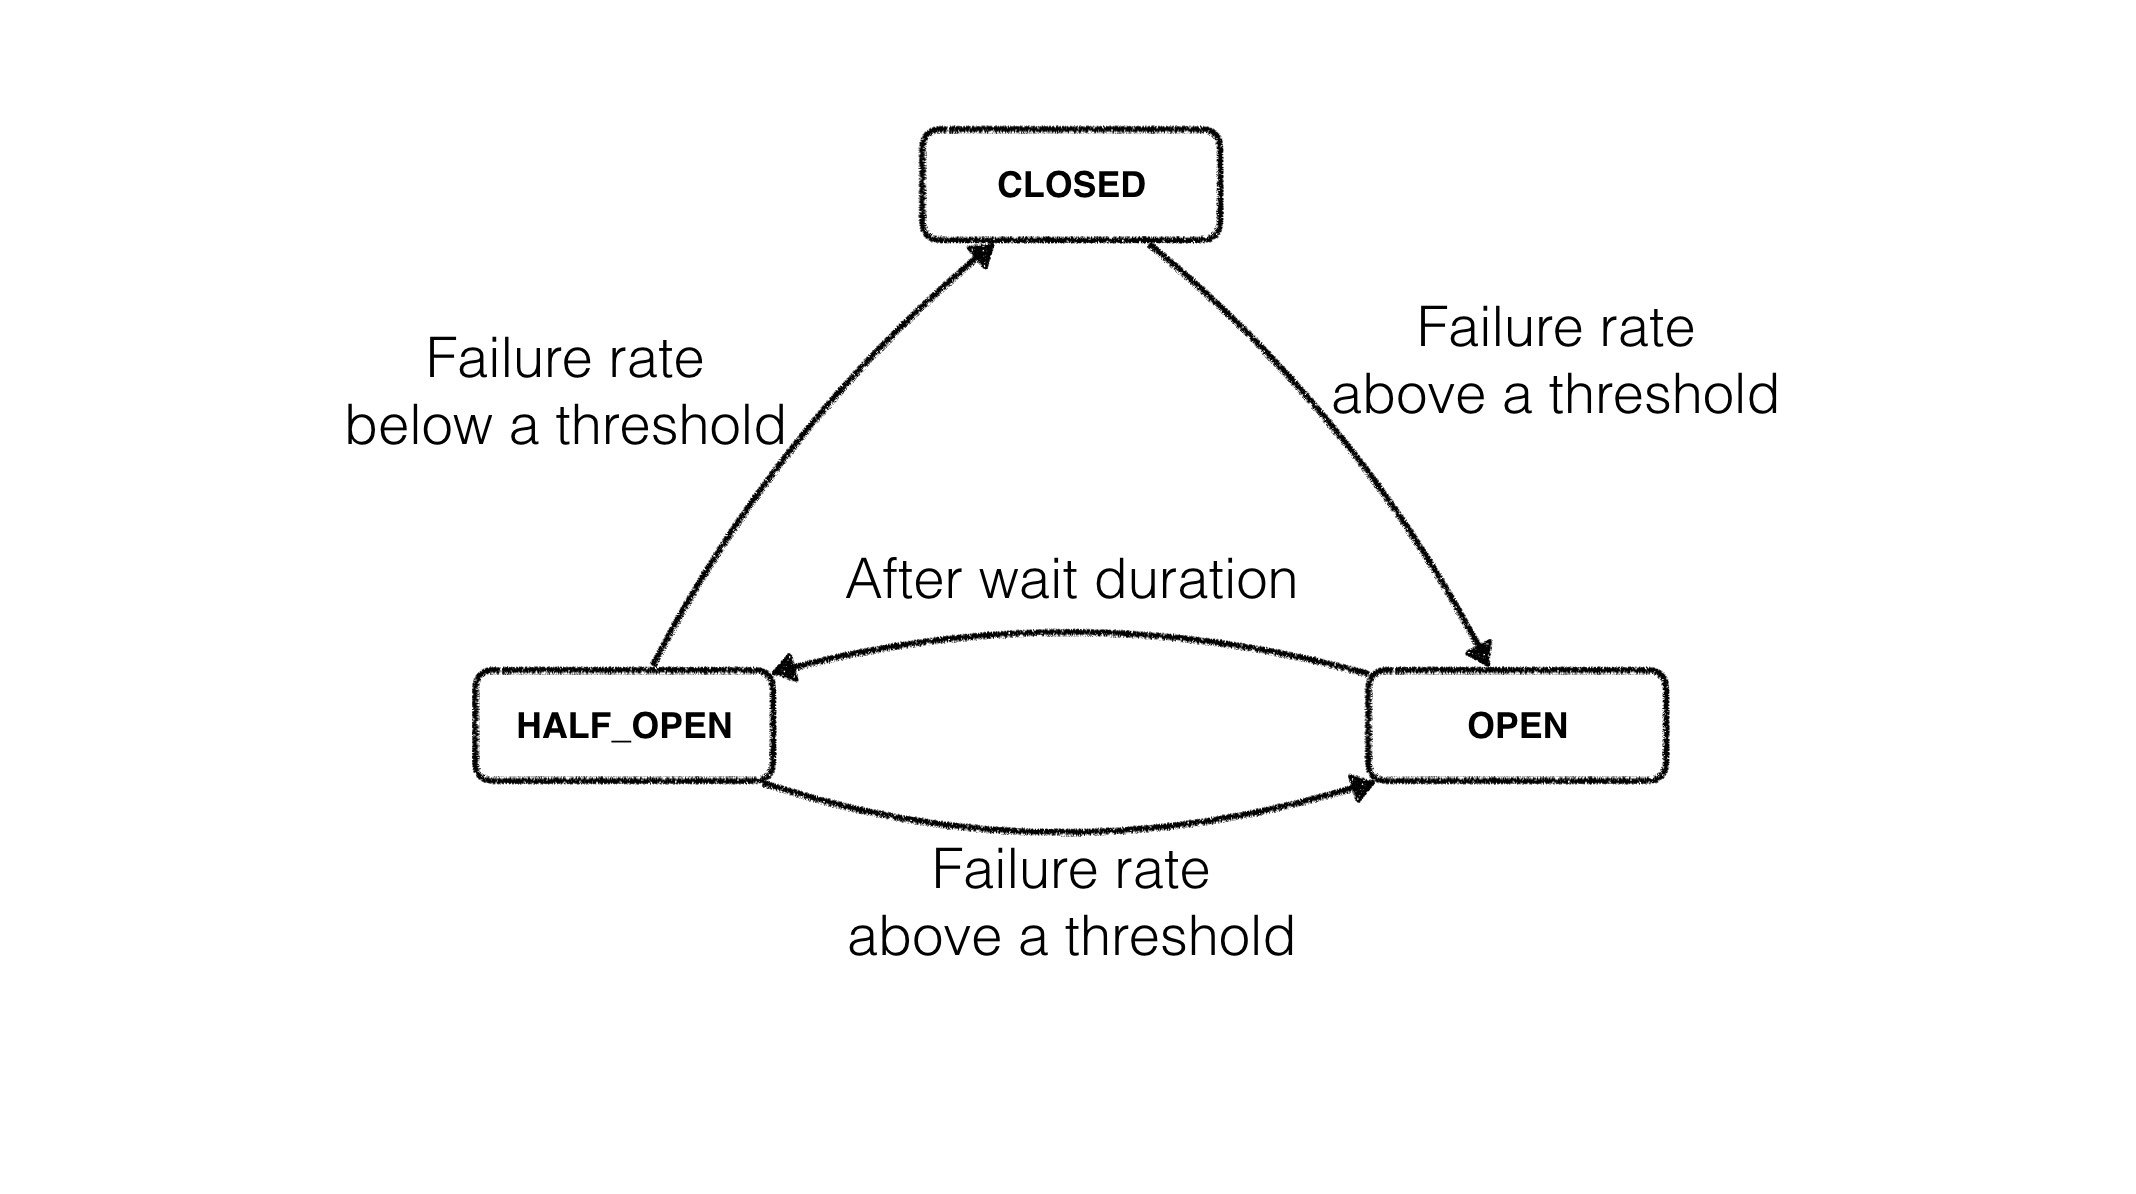
The Resilience4j circuit breaker is implemented as a finite state machine with three normal states: CLOSED, OPEN and HALF_OPEN and two special states DISABLED and FORCED_OPEN.
The implementation uses a sliding window to store and aggregate the outcome of calls. You can choose between a count-based sliding window and a time-based sliding window. The count-based sliding window aggregrates the outcome of the last N calls. The time-based sliding window aggregrates the outcome of the calls of the last N seconds.
What is Failure
- By default, all exceptions count as a failure.
- We can list out exceptions that should count as a failure
- If we define list of exceptions specifically then all other exceptions are counted as a success
- If exceptions ignored then neither count as a failure nor success
When State is Changed
- The state of the CircuitBreaker changes from CLOSED to OPEN when the failure rate (or percentage of slow calls) is equal or greater than a configurable threshold. For example when more than 50% of the recorded calls have failed.
- The failure rate and slow call rate can be calculated only if a minimum number of calls were recorded. For example, if the minimum number of required calls is 10, then at least 10 calls must be recorded, before the failure rate can be calculated. If only 9 calls have been evaluated the CircuitBreaker will not trip open even if all 9 calls have failed.
- After a wait time duration has elapsed, the CircuitBreaker state changes from OPEN to HALF_OPEN and permits a configurable number of calls to see if the backend is still unavailable or has become available again.
- If the failure rate or slow call rate is equal or greater than the configured threshold, the state changes back to OPEN.
- If the failure rate and slow call rate is below the threshold, the state changes back to CLOSED.
- When Circuit in OPEN state all calls are rejected with a CallNotPermittedException.
- Additionally Resilience4j Circuit Breaker supports two more special states, DISABLED (always allow access) and FORCED_OPEN (always deny access). In these two states no Circuit Breaker events (apart from the state transition) are generated, and no metrics are recorded. The only way to exit from those states are to trigger a state transition or to reset the Circuit Breaker.
Quick Start of with Spring Boot 2
Gradle configurations for the repository:
repositories {
    jCenter()
}

dependencies {
  compile "io.github.resilience4j:resilience4j-spring-boot2:${resilience4jVersion}"
  compile('org.springframework.boot:spring-boot-starter-actuator')
  compile('org.springframework.boot:spring-boot-starter-aop')
}
Add following lines to Application.yml
resilience4j.circuitbreaker:
    configs:
        default:
            slidingWindowSize: 100
            permittedNumberOfCallsInHalfOpenState: 10
            waitDurationInOpenState: 10000
            failureRateThreshold: 60
            eventConsumerBufferSize: 10
            registerHealthIndicator: true
        someShared:
            slidingWindowSize: 50
            permittedNumberOfCallsInHalfOpenState: 10
    instances:
        backendA:
            baseConfig: default
            waitDurationInOpenState: 5000
        backendB:
            baseConfig: someShared
Use following Java code example (BACKEND here just a constant string which can be “backendA” or “backendB” depend on what setting do you want to apply from application.yml)
@CircuitBreaker(name = BACKEND, fallbackMethod = "fallback")
@RateLimiter(name = BACKEND)
@Bulkhead(name = BACKEND)
@Retry(name = BACKEND, fallbackMethod = "fallback")
@TimeLimiter(name = BACKEND)
public Mono<String> method(String param1) {
    return Mono.error(new NumberFormatException());
}

private Mono<String> fallback(String param1, IllegalArgumentException e) {
    return Mono.just("test");
}

private Mono<String> fallback(String param1, RuntimeException e) {
    return Mono.just("test");
}
For more detail information about applying resilience4j to spring-boot-2 refer to here
Easy Integration with Prometheus and Grafana
Another good advantage of Resilience4j is that it easily can be integrated with prometheus and grafana in order to provide us good monitoring system.
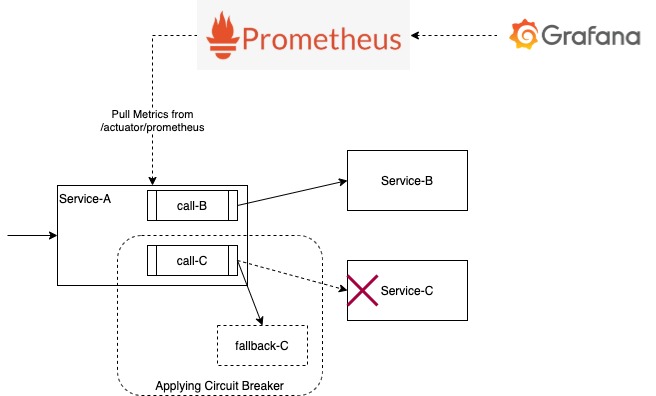
In order to implement this scenario we have to make sure that our spring-boot application contains actuator libraries and metrics for prometheus should be exported through the actuator
compile('org.springframework.boot:spring-boot-starter-actuator')
compile('io.micrometer:micrometer-registry-prometheus")
For quick-run Prometheus and Grafana can be configured and run using docker-compose.yml (this file runs well on Linux docker, didn’t work with macOS):
version: '3'
services:
  prometheus:
    image: prom/prometheus
    container_name: prometheus
    network_mode: "host"
    volumes:
      - ./docker/prometheus.yml:/etc/prometheus/prometheus.yml
  grafana:
    image: grafana/grafana
    container_name: grafana
    network_mode: "host"
    volumes:
      - ./docker/grafana-ds.yml:/etc/grafana/provisioning/datasources/local-prometheus.yaml
      - ./docker/prometheus-grafana.json:/etc/grafana/provisioning/dashboards/prometheus-grafana.json
      - ./docker/grafana-prometheus-dashboard.yml:/etc/grafana/provisioning/dashboards/grafana-prometheus-dashboard.yml
    # - ./docker/grafana.ini:/etc/grafana/grafana.ini
    #command: ["--config=/etc/grafana/grafana.ini"]
    env_file:
      - ./docker/grafana.env
there must be a folder called “docker/” on the same level as docker-compose.yml. Inside docker folder the following files should be located:
- grafana-ds.yml : contains data source auto initiation information (if we don’t initialize here, then it should be done manually through grafana UI)
datasources:
  - name: Prometheus
    type: prometheus
    access: proxy
    url: http://localhost:9090
- grafana-prometheus-dashboard.yml : configures grafana (explicitly to check /etc/grafana/provisioning/dashboards folder for loading dashboards)
- name: 'default'
  org_id: 1
  folder: ''
  type: 'file'
  options:
    folder: '/etc/grafana/provisioning/dashboards'
-
prometheus-grafana.json : grafana dashboard for showing resilience4j data (File is little bit for this context to show, it can be downloaded from here)
-
grafana.env : contains docker container environment variables that are used while starting grafana server. For example we can predefine user name and password for our grafana server
[server]
# GF_SERVER_DOMAIN=localhost
# GF_SERVER_HTTP_PORT=3001
# GF_SERVER_PROTOCOL=http

[security]
GF_SECURITY_ADMIN_USER=admin
GF_SECURITY_ADMIN_PASSWORD=password
- prometheus.yml : prometheus configuration file
global:
  scrape_interval:     15s # By default, scrape targets every 15 seconds.

  # Attach these labels to any time series or alerts when communicating with
  # external systems (federation, remote storage, Alertmanager).
  external_labels:
    monitor: 'resilience4j-test-monitor'

# A scrape configuration containing exactly one endpoint to scrape:
scrape_configs:
  # The job name is added as a label `job=<job_name>` to any timeseries scraped from this config.
  - job_name: 'prometheus'

    # Override the global default and scrape targets from this job every 5 seconds.
    scrape_interval: 5s

    static_configs:
      - targets: ['172.31.01.240']

  - job_name:       'resilience4j-test-spring-boot2'

    # Override the global default and scrape targets from this job every 5 seconds.
    scrape_interval: 5s

    metrics_path: /actuator/prometheus

    static_configs:
      - targets: ['172.31.01.240']
to run/stop docker composition:
# start
docker-compose -f docker-compose.yml up

## if you want to run in background
## docker-compose -f docker-compose.yml up -d

# stop
docker-compose -f docker-compose.yml down